Install the VidyoRoom HD-40C
|
Note This product is End of Life. |
What's included
Your VidyoRoom HD-40 Revision C system is shipped with the following items:
|
Item |
Length |
Quantity |
|---|---|---|
|
Power adapter and interchangeable plugs for the United States, Europe, Ireland/United Kingdom, and Australia |
10 ft (3.05 m) total |
1 |
|
VESA mount bracket and hardware |
N/A |
1 |
|
HDMI to HDMI cable |
6 ft (1.828 m) |
1 |
|
Mini DisplayPort to HDMI adapter |
N/A |
2 |
|
External infrared receiver with USB cable |
6 ft (1.828 m) |
1 |
|
Ethernet cable, Cat5e |
7 ft (2.13 m) |
1 |
|
Infrared remote control with AAA batteries |
N/A |
2 batteries |
Depending on your order, you may receive the DVI to USB adapter:
|
DVI to USB3 Adapter |
|---|
|
DVI to USB 3.0 adapter – includes 3 ft. (.91 m) USB 3.0 cable |
The diagrams below show connections for both the Logitech CC3000e and Sony EVI-HD7V cameras with the Phoenix Quattro3 speakerphone. Additional peripherals are sold separately.
|
Logitech CC3000e |
Sony EVI-HD7 |
Phoenix Quattro |
|---|---|---|
|
Camera, speakerphone, remote control, and powered hub |
Camera |
Quattro 3 unit |
|
Wall or table camera mount |
Power adapter and power cables |
USB A to USB Mini B cable |
|
Speakerphone to hub cable – 16 in (40.6 cm), USB cable and remote control |
Remote control |
Ethernet cable |
|
Adhesive (for mounting hub) and Power adapter |
VISCA to serial cable – 6 ft (1.82 m) |
|
|
|
USB 3.0 A to B cable – 6 ft (1.82 m) |
|
How to install your HD-40C
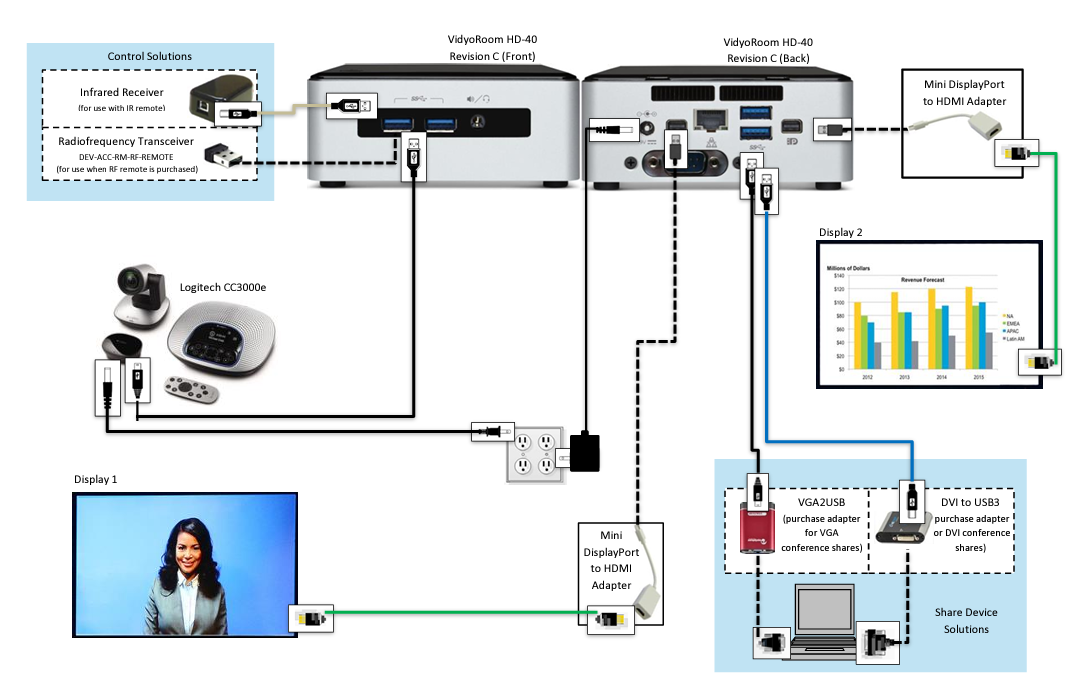
How to install your HD-40C with a USB-connected camera (Logitech CC3000e pictured)
Refer to this diagram to connect a Logitech CC3000e camera and other peripherals to the VidyoRoom HD-40C:
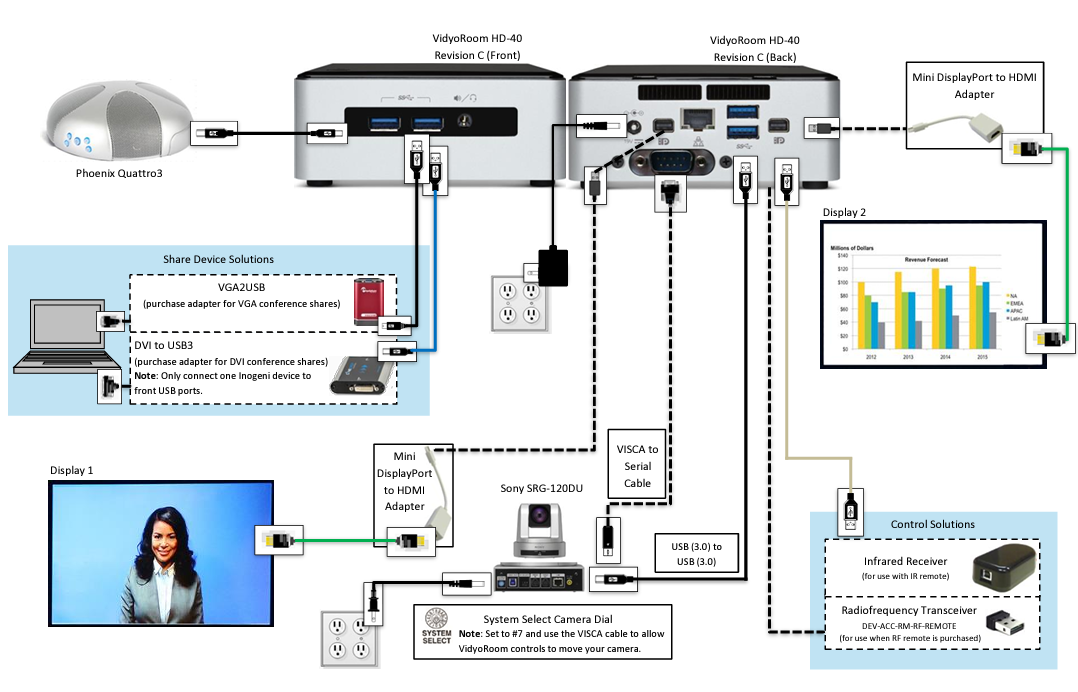
How to install your HD-40C with a DVI or HDMI-connected camera (Sony EVI-HD7V pictured)
Refer to this diagram to connect a Sony EVI-HD7V camera and other peripherals to the VidyoRoom HD-40C:
Where to get more information
To get more information about the HD-40C, refer to this additional documentation:
- For a list of peripherals compatible with the HD-40C and other room models, see Supported peripherals for VidyoConnect Room and VidyoRoom systems.
- For information about how to configure your VidyoConnect Room or VidyoRoom system as an administrator, see the VidyoConnect Room and VidyoRoom Administrator Guide.
- For details about each release, such as the new features and resolved issues, see the VidyoConnect Room and VidyoRoom Release Notes and the VidyoConnect Room and VidyoRoom Product Bulletins.
- For a list of specifications for the HD-40C, see Safety, regulatory, and environment specifications.
How to configure supported television picture settings
Depending on your television picture settings, the VidyoRoom UI may not be properly aligned. This could cause the edges of the UI to appear cut off as shown here:
If you notice this with your television, refer to this table to reconfigure your television picture settings to properly align the user interface:
|
TV Manufacturer |
Steps to align |
|---|---|
|
LG |
|
|
Samsung |
|
|
Sharp |
|
|
Sony |
|
|
Vizio |
|
For more information, refer to the documentation provided with your television.
How to use the Lucky Clover remote control keypad
The Lucky Clover remote control keypad is an alphanumeric character input method for your VidyoRoom remote control. Enabled by default, the feature can be disabled, if desired.
To disable the Lucky Clover remote control keypad:
- Press the Settings button on the remote control. The Settings screen appears with the Account tab selected by default.
- Use the arrow buttons to navigate to the Advanced tab.
- Press the down arrow key to the Lucky Clover Keypad field, then the right arrow key to turn it OFF.
To use the Lucky Clover remote control keypad:
- When in applicable text fields, press any button on the alphanumeric keypad. The corresponding number is shown in the text field. Alphanumeric options for the selected number are presented in a surrounding, clockwise clover format starting from the top.

- Use the arrow keys to select the options presented from top, right, bottom, or left (where applicable). Characters are automatically selected when either an arrow key is pressed; an alphanumeric character is pressed again, or OK is pressed.
When available, remote control hints appear on the lower part of the screen.
How to configure the account and network settings
To configure the VidyoPortal account settings:
- When the VidyoRoom powers up, press the Settings button on the remote control. The Account screen displays the default IP address of your VidyoPortal as well as the default username and password that came with your VidyoRoom. You must change these as described here.
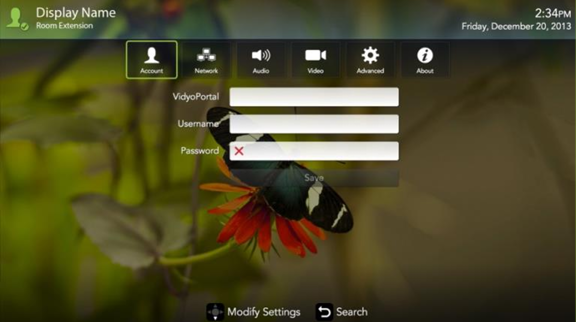
- Navigate to the Username text box and use the Lucky Clover Keypad to enter the name of the VidyoPortal.
- Navigate to the Password text box and use the Lucky Clover Keypad to enter the password for the VidyoPortal.
- Navigate to the VidyoPortal text box and use the Lucky Clover Keypad to enter the IP address or URL of the VidyoPortal. (You don’t have to enter “http://”.)
- Navigate to the Save button and press OK to save your settings.
To configure the network settings:
- Use the arrow buttons to navigate to the Network tab and press OK. The Network screen appears.
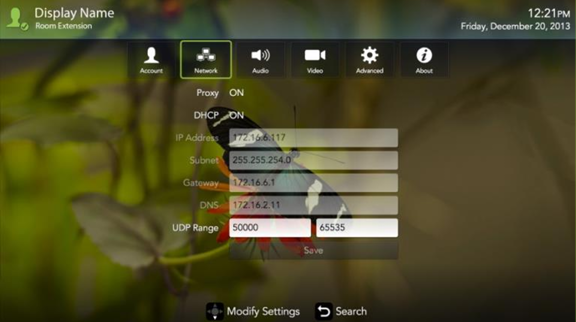
Your VidyoRoom is set to Use DHCP by default. This enables it to automatically obtain its IP address. - If you want to change your VidyoRoom network settings, press the down arrow key to the DHCP field, then the right arrow key to turn DHCP OFF.
- Navigate to each text box and enter the appropriate network setting.
- Navigate to the Save button and press to save your settings.
- Navigate to the Save button and press OK to save your settings.
For complete information about how to configure your VidyoConnect Room or VidyoRoom system as an administrator, see the VidyoConnect Room and VidyoRoom Administrator Guide.