Upgrade VidyoRoom to Windows 10 IoT
The following VidyoRoom systems can be upgraded to Windows 10 IoT:
- HD-2
- HD-3 and HD-3B
- HD-40C
Create your own bootable USB key
|
Note You can only create a bootable USB key in the English language. If your computer system defaults to a different language, you must first change your Windows 10 computer system language to English by going to Settings > Time & Language and selecting English. |
Minimum requirements for PC and USB stick/SSD
- PC
- Windows 10 (computer must be set to the English language)
- No other removable drives connected to your PC
- USB stick/SSD
- At least 32 GB or more capacity
- USB 3.0 and above
Enghouse Vidyo has determined that it takes approximately 15 minutes to create a USB key for a VidyoRoom HD-2, HD-3, HD-3B, or HD-40C when using an HP x 740w USB device (USB 3.1) with 32 GB and a PC with these specifications:
Package contents
The Windows 7 to Windows 10 IoT package contains the following file:
- Win10IOT FFU image file (approximately 20 GB)
- WINPE containing the FFU installer (approximately 320 MB)
- prepareUSB.bat script (which will install FFU and WINPE on your USB)
- MakeWinPEMedia.cmd
Create the bootable USB key
- Copy the contents of the package located at VidyoRoom Packages to a folder and extract them into the same folder.
|
Note The contents of the package MUST reside in the same folder after copy and extraction. Error checks for this have been included in the prepareUSB.bat file. |
- Run Windows Command Prompt as an administrator.
- Format and create a bootable USB key by executing the prepareUSB.bat file from your Windows PC.
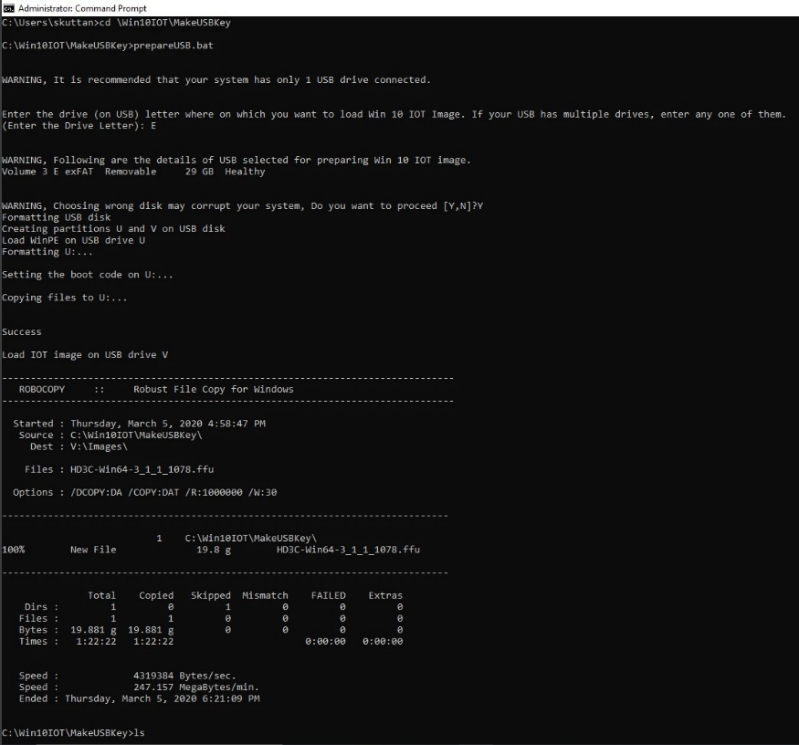
- Continue by upgrading your VidyoRoom system as described below.
Upgrade to Windows 10 IoT
|
Note
|
To upgrade your VidyoRoom system to Windows 10 IoT:
- Reboot your system by connecting the USB key that you created above to a USB port on your VidyoRoom system. The Windows IoT Image Installation screen displays.
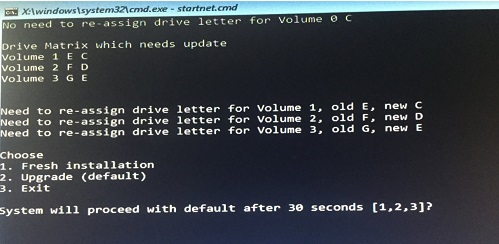
The system upgrades to Windows IoT without losing its configuration.
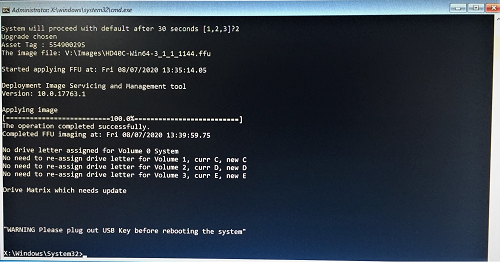
- Disconnect the USB key from the USB port and reboot the system by powering it off and then powering it back on.
- Confirm the system upgraded successfully by checking that the VidyoRoom Admin UI, VidyoRoom OnScreen UI, and VidyoRemote indicate that the correct version of Windows is now running. For more information, refer to the VidyoConnect SE and VidyoRoom SE Installation Guide.
- If you have a VidyoRoom JITC Edition, log in to the portal using your username and password. Otherwise, skip this step.
- Perform a few operations on your VidyoRoom system to ensure that it is working properly.