Vidyo Event Service deployment guide
About this Guide
Prerequisites
Deploying the Event Service
- Deploying the Vidyo Event Services File
- Setting up a Custom SSL Certificate
- Setting up the VidyoPortal Service
- Obtaining the JWT Authentication Secret
- Configuring the VidyoPortal System Level Event Service
- Configuring the VidyoPortal System Level Message Node (NATS)
- Configuring the Vidyo Event Service
- Setup Prerequisites
- Setting up the Vidyo Event Service
About this guide
The VidyoPortal Event Services Deployment Guide provides information on how to prepare for the setup and configuration of the VidyoPortal Event Services.
Document conventions
- Items marked with Note or Caution indicate that the information deserves special attention.
- Text you type into an on-screen field, or a browser address bar appears in bold font. Variables are shown surrounded by brackets: http://[IP Address or FQDN]
- Navigational paths have greater-than symbols and are italicized: Click Settings > Options.
Contact information
To submit comments or questions about the content in this document, please contact the Vidyo Customer Support team via email or phone at the locations listed in the Contact Us article.
Prerequisites
The following are the items you require before you can begin the setup:
- Network Information
- Certificates
- Firewall
- Machine Provisioning
- Access
- Files
Network information
- IP Address
- Subnet Mask
- Default Gateway
- DNS Server(s)
- Public FQDN - should already be added to DNS
- Firewall - this service is expected to be deployed in front of a firewall as some ports are public whereas others are meant to be only accessible internally to the VidyoPortal. Refer to the Firewall section for details.
Certificates
- PFX file for certificate that covers the Public FQDN
Firewall
- Inbound TCP Port 443 open to the public (where your WebRTC endpoints will be coming from).
- Inbound TCP Port 4222 open ONLY from the VidyoPortal—make sure to account for VidyoPortals deployed in Disaster Recovery or Hot Standby modes.
Machine Provisioning
- Minimum of 8 vCPUs for Production with 18 GHz Reserved; 4vCPU for Lab use
- Minimum of 8 GB RAM for Production with 8 GB Reserved; 4 GB for Lab use
- 50 GB Disk
Access
- SSH access to the deployed OVA for System Console access
- Platform API user configured with appropriate SSH key
Files
- VidyoEventServices-21.1.0.055.05.ova
Deploying the Event Service
This section includes instructions on how to deploy the event services in your environment and is divided into the following subsections:
- Deploying the Vidyo Event Services File
- Setting up a Custom SSL Certificate
- Setting up the VidyoPortal Service
- Configuring the VidyoPortal System Level Event Service
- Configuring the VidyoPortal System Level Message Node (NATS)
Deploying the Vidyo Event Services File
Use the following procedure to deploy the Vidyo Event Services file.
To deploy the Vidyo event services file:
- In your VMWare environment, ensure that your machine provisioning meets the requirements in the Prerequisites section.
- Deploy VidyoEventServices OVA file in your VMWare environment.
- Power on the machine.
- Log in to the VMWare console with your default username and password: admin/password.
- Configure the following:
- IP Address
- Subnet Mask.
- Default Gateway.
- DNS Server (s).
- Server name and domain (aka Server FQDN).
- Reboot.
Setting up a Custom SSL Certificate
You need the following to successfully set up a custom SSL certificate:
- The Platform APIs.
- A PBX file with the certificate.
- An SSH private/public key pair.
|
Note How to generate an SSH key is outside the scope of this document. |
To set up the certificate:
- In the Vidyo Console, set up a VidyoPlatform API user.
- Use the SSL_InstallPFX API to install the PFX on the server. SSL_InstallPFX is used to install password protected .pfx files. This install is done in two steps:
- Use the “VidyoUpload” Platform API to upload the .pfx file to the VidyoEvent Service server.
- Run the “SSL_InstallPFX” Platform API to install the .pfx file:
- Create a new KeyStore using “createKeystore“ Platform API and protect it with the password defined by the user:
- Reboot your server to apply the configurations.
kram@test-machine: ~$ cat name-of-file.pfx | ssh apiuser@10.10.10.10 VidyoUpload
12+1 records in
12+1 records out
6261 bytes (6.3 kB, 6.1 KiB) copied, 0.000115537 s, 54.2 MB/s
The second method is to pass a remote URL to the command:
echo -n ********** | ssh apiuser@10.10.10.10 SSL_InstallPFX http://updates.vidyo.com/VidyoWebRTC/VidyoQA.com.pfx
Cert: /C=US/ST=New Jersey/L=Hackensack/O=Vidyo, Inc./CN=*.vidyoqa.com
Cert Chain: /C=US/O=DigiCert Inc/CN=DigiCert SHA2 Secure Server CA
Cert Chain: /C=US/O=DigiCert Inc/OU=www.digicert.com/CN=DigiCert Global Root
CA CA Certs: 3 WARNING: Skipping duplicate certificate self-cert.pem
kram@test-machine: ~$ echo -n ********** | ssh apiuser@10.10.10.10 SSL_InstallPFX
Cert: /C=US/ST=New Jersey/L=Hackensack/O=Vidyo, Inc./CN=*.vidyoqa.com
Cert Chain: /C=US/O=DigiCert Inc/CN=DigiCert SHA2 Secure Server CA
Cert Chain: /C=US/O=DigiCert Inc/OU=www.digicert.com/CN=DigiCert Global Root CA CA
Certs: 3 WARNING: Skipping duplicate certificate self-cert.pem
kram@test-machine: ~$ echo ********** | ssh apiuser@10.10.10.10 VidyoEventService createKeystore import_ca: going to import 131 CA cert(s) into keystore /opt/vidyo/data/VidyoEventService/keystore.p12
...in progress: processed 10 certs from total 131
...in progress: processed 20 certs from total 131
...in progress: processed 30 certs from total 131
...in progress: processed 40 certs from total 131
...in progress: processed 50 certs from total 131
...in progress: processed 60 certs from total 131
...in progress: processed 70 certs from total 131
...in progress: processed 80 certs from total 131
...in progress: processed 90 certs from total 131
...in progress: processed 100 certs from total 131
...in progress: processed 110 certs from total 131
...in progress: processed 120 certs from total 131
...in progress: processed 130 certs from total 131
...done: processed 131 certs from total 131
OK
Setting up the VidyoPortal Service
The VidyoPortal Service setup requires a JWT Authentication Secret which you can obtain by either generating or setting it.
This section provides information on:
- Obtaining the JWT Authentication Secret
- Configuring the VidyoPortal System Level Event Service
Obtaining the JWT Authentication Secret
JWT is created with a secret key and that secret key is private to you which means you will never reveal that to the public or inject inside the JWT token.
You can obtain a JWT Authentication Secret by any one of these methods:
- Generating a JWT Authentication Secret
- Setting a JWT Authentication Secret
Generating a JWT Authentication Secret
The VidyoPortal can generate its own random secret and return that back as part of a REST API response.
URL: /admin/api/v1/system/tenants/jwtAuthenticationSecret
Method: PUT
Authentication: Super credentials
Response body:
| Field | Data type | Mandatory? | Description |
| version | String | Yes | Defines the version of the API. |
| status | String | Yes | Defines the response status. For successful response, its value will be “success." |
| data | Object | Yes | This is the element which encapsulates the API response. For this API, its value is null. |
| Secret | String | Yes | This is the new authentication secret generated on the change of signing algorithm. |
{
"version": "1",
"status": "success",
"data": {
"authenticationSecret": [{
"secret":
"asdfasdfasfLXZlcnktbG9uZy1zZWNyZXQta2V5LWZvci1zaWduaW5nLWp3dC10b2tlbnM="
}]
}
}
HTTP status codes, Error codes and messages:
| HTTP Response Code | Error Code | Error Message | Scenario |
| 400 | 101017 | Invalid Request. | If signing algorithm name is valid. Any other request body validation failure. |
| 404 | 101018 | Signing Algorithm not configured. | If signing algorithm is fetched while it is not configured at the tenant level. |
| 404 | 101019 | Authentication secret not configured. | If authentication secret is fetched while it is not configured at the tenant level. |
| 403 | N/A | N/A | Unauthorized user if anybody other than the Super Admin tries to access. Invalid tenant ID/FQDN. |
| 500 | 101020 | Internal server error. | Internal server error. |
{
"version": "1",
"status": "failure",
"error": {
"code": 101017,
"message": "Invalid request",
"errors": []
}
}
Setting a JWT Authentication Secret
Alternatively, you can generate you own JWT Authentication Secret and use the same REST API to set it.
URL: /admin/api/v1/system/tenants/jwtAuthenticationSecret
Method: PUT
Authentication: Super credentials
Request body: N/A
| Field | Data Type | Mandatory | Description | Validations |
| N/A | String | No |
The authentication secret, example: 2deC;p<V:3#p85?S3T#,4S][qpJ6&7R7KT(C"rET(:<HPr3 |
Validation of authentication secret, it must contain at least one:
Length of authentication secret is dependent on JWT signing algorithm, for HS384 is size minimum 48 characters. Should be encoded in Base64. |
Example: 3gb5Zi3sDzs8oNAUiHlvd2SjBRZnnoAlQ3l1eIbEFlbsciNCglGuFw8sNNLyAEZb (BASE 64)
| Field | Data Type | Mandatory | Description |
| version | String | Yes | Defines the version of the API. |
| status | String | Yes | Defines the response status. For successful response, its value will be “success." |
| data | Object | Yes | This is the element which encapsulates the API response. For this API, its value is null. |
| Secret | String | Yes | This is the new authentication secret generated on the change of signing algorithm. |
HTTP status codes, Error codes and messages
| HTTP Response Code | Error Code | Error Message | Scenario |
| 404 | 101018 | Signing Algorithm not configured. | If signing algorithm is fetched while it is not configured at the tenant level. |
| 404 | 101019 | Authentication secret not configured. | If authentication secret is fetched while it is not configured at the tenant level. |
| 403 | N/A | N/A | Unauthorized user if anybody other than the Super Admin tries to access. Invalid tenant ID/FQDN. |
| 500 | 101020 | Internal server error. | Internal server error. |
{
"version": "1",
"status": "failure",
"error": {
"code": 101017,
"message": "Invalid request",
"errors": []
}
}
Configuring the VidyoPortal System Level Event Service
This section provides the information you need to help you configure the VidyoPortal System Level Event Service:
- Setup Prerequisites
- Configuring the Event Services System (REST API)
Setup Prerequisites
To complete the setup, you will need the following:
- EVENT_SERVICE_URL: This is the Public FQDN of the Vidyo Event Service.
- MESSAGING_SERVER_CLUSTER_ID: This should always be set as “vidyo-nats-streaming”.
- Messaging Server Username and Password: This is a username and password of your choosing that will be used to authenticate the VidyoPortal and the Vidyo Event Services Messaging communications.
Configuring the Event Services System (REST API)
URL: /admin/service/systemconfig/v1/configuration
Method: PUT
Authentication: Super credentials
Request body: N/A
{
EVENT_SERVER_URL": "wss://vidyoeventservice.example.com",
"MESSAGING_SERVER_CLUSTER_ID": "vidyo-nats-streaming"
}
Configuring the VidyoPortal System Level Message Node (NATS)
This section provides the information you require to help you configure the VidyoPortal System Level Message Node Configuration (NATS) Service:
- Setup Prerequisites
- Setting Messaging System Configuration (REST API)
Setup Prerequisites
To complete the setup, you will need the following:
- messagingServerUrl: This is the FQDN of the Vidyo Event Service that the VidyoPortal will use to connect to the internal messaging interface of the Vidyo Event Service (port 4222).
- Messaging Server Username and Password: This is a username and password of your choosing that will be used to authenticate the VidyoPortal and the Vidyo Event Services NAS communications (NATS). You will need to enter this in the Vidyo Event Service configuration.
Setting Messaging System Configuration (REST API)
URL: /admin/service/systemconfig/v1/configuration
Method: PUT
Authentication: Super credentials
Request body: N/A
{
"MESSAGING_NODE_CONFIGURATION":[{
"messagingServerUrl":"tls://vidyoeventservice.example.com,
"username":"mymessagingerviceuser",
"password":"mymessagingservicepassword"
"}]
}
Configuring the Vidyo Event Service
This section provides the information you require to help you configure the Vidyo Event Service:
- Setup Prerequisites
Setup Prerequisites
To complete the setup, you will need the following information:
- NATS User and Password: this will be the credentials used to authenticate your Vidyo Epic Service to the VidyoPortal as part of your Messaging Node Configuration.
- JWT Token Secret: This is your JWT Authentication Key secret in Base64 encoded format.
Setting up the Vidyo Event Service
Use the following procedure to set up the Vidyo Event Service.
To set up the Vidyo event service:
- Log into the System Console.
- Go to Advanced > Vidyo Event Service.
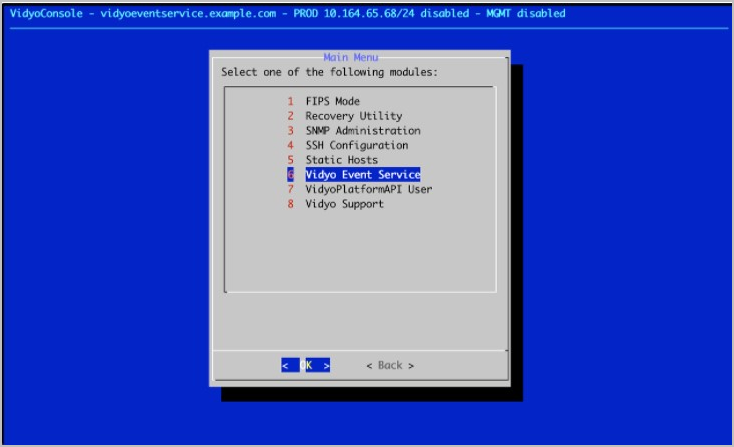
- Select NATS User Management.
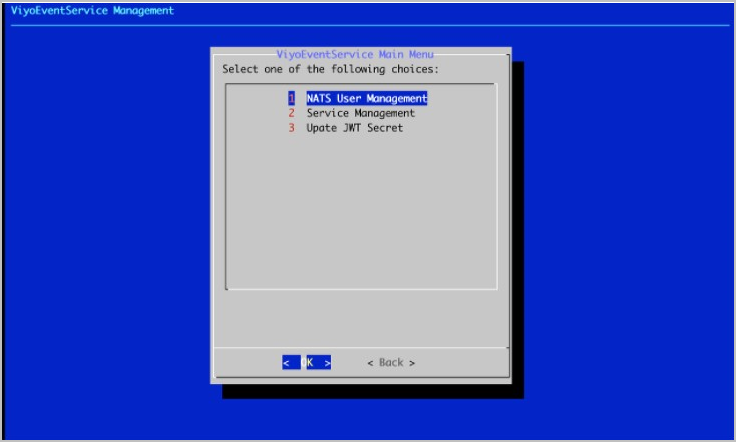
- Select Enable NATS Authentication.
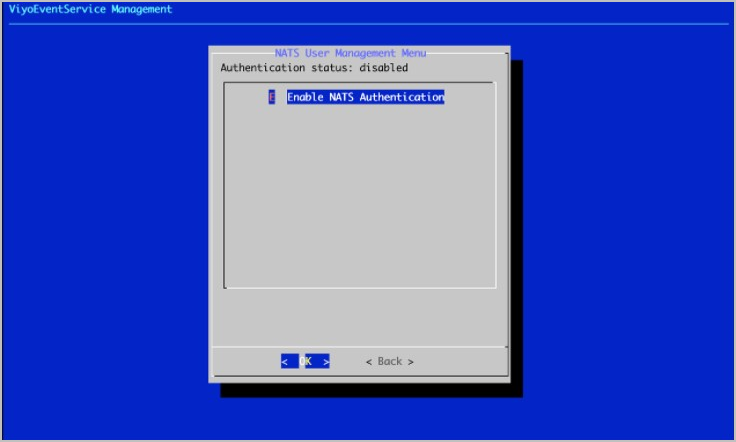
- Select Add User.
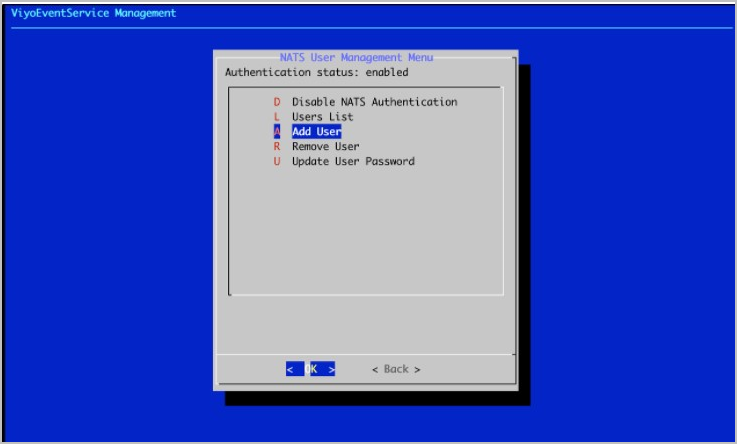
- Enter the Messaging Server (NATS) Username and Password in the prompts that follow. This must be the same username and password used in the Vidyo Portal MESSAGING_NODE_CONFIGURATION.
- Return to the Vidyo Event Service Menu and select Update JWT Secret.
- Enter the JWT Authentication Secret (same as configured in VidyoPortal) in Base64 format.
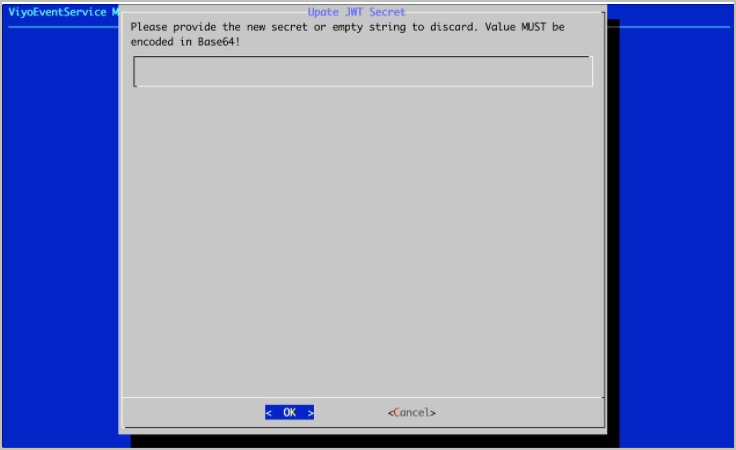
- Click OK. Your Vidyo Event Service and VidyoPortal are now configured to work together.
