Tenant Admin: Manage users
This section describes how a Tenant Admin can manage users.
- Log in to the Tenant Admin portal
- View user details
- Add a user
- Edit a user
- Delete a user
- Export users
- Import users
Log in to the Tenant Admin portal
- Enter the IP address or FQDN for the VidyoPortal in the address bar of a web browser as follows: http://[IP address or FQDN]/admin. TheLogindialog displays.
- Optionally change the language for the Admin portal only.
- Enter the default Admin user name and password:
- User Name:admin
- Password:password(case sensitive)
- ClickLogin.
View user details
The Users page displays by default. This page lists the users in a table format. You can drag and drop the column headings to arrange them in the order you prefer.
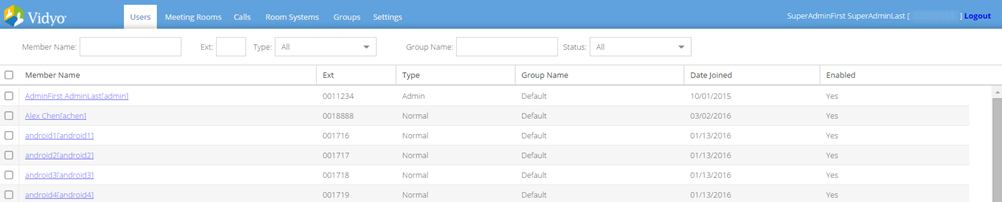
You can search by member name, extension, type, group name, and whether or not the user account is enabled using the various fields above the table. The member name search works for both display names and usernames. These names are the ones that display in the VidyoPortal and may not necessarily be the user's full name.
You can change your view by using the buttons at the bottom of the table:
- Click Refreshto update your view of the table.
- Click theFirst Page,Previous Page,Next Page, andLast Pagedirection arrows to scroll through multiple pages of results in the table.
- Enter a page number to access a specific page of results in the table.
Add a user
As the administrator, you can add yourself and others as users.
- On the Users page, clickAdd Userat the bottom of the page. The Add User: New Userdialog displays.
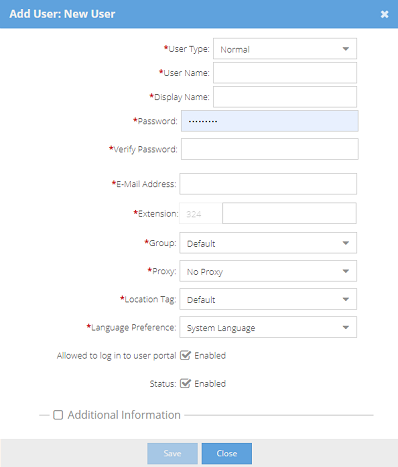
- Enter the following mandatory information.
| Field | Description |
|---|---|
|
User Type |
Select one of the following:
|
|
Display Name |
For VidyoRoom , the display name is the system name set by the administrator and the name that displays in the top-left corner of the home page. For VidyoConnect, the users' display name appears below their video images when they are in a conference and on the Participants List. |
|
User Name |
Enter the name the user provides when logging in to the system. The user name must be alphanumeric, and it cannot contain any spaces or punctuation except for the @ sign, periods, underscores, or dashes. The maximum length is 80 characters. If your intended entry has already been taken, you are prompted to select a different name. |
|
PasswordandVerify Password |
You must enter the password two times to set it. Users may change their own passwords later. Like the user name, the password also has a maximum length of 40 characters, but there is no limitation regarding which characters you can use. |
|
E-Mail Address |
Enter a valid email address for the user. This is the address to which the new account emailissent. If notifications are enabled and a user's email address is not set correctly, the user may not be able to use the Forgot Password function. |
|
Extension |
Enter the numeric extension you want associated with the user. This value must be unique for each user. If your intended entry has already been taken, you'll be prompted to select a different extension. |
|
Group |
Select either the default group or another group you have created. Changing the group may change the maximum number of users and the bandwidth allowed for the user's personal meeting room. The groups must be defined before you can assign users to them. |
|
Proxy |
Select either the default proxy or another proxy you have created. You must define proxies before assigning them. |
|
Location Tag |
Select the user's location tag. |
|
Language Preference |
SelectSystem Languageto apply the currently selected system-wide language. Otherwise, select any other language to change the language for this specific user only. |
- If you want to disable the user’s ability to log in to the User portal, clear the Allowed to log in to user portal check box.
- If you want to put a user on hold with all of their information intact, clear the Status check box.
- If you want to add information about the user’s phone number, department, title, location and IM address, select the Additional Information check box and enter the information.
- Click Save. When all required fields are complete and valid, the data is saved to the database, the main table is displayed, and a success message is displayed at the top of the page.
Edit a user
- On the Users page, find the user you wish to edit by using the search filters, sorting on the headers, or by pagination.
- Click the name of the user that needs to be edited. TheEdit Userdialog displays.
- Edit the user's information as needed. You can edit any of the settings. For a description of these settings, see Add a user.
- ClickSave.
Delete a user
|
Note
|
- On the Users page, find the user you wish to delete by using the search filters, sorting on the headers, or by pagination.
- Select one or more check boxes at the left of the row of the user(s) that need to be deleted.
- ClickDeleteat the bottom of the page and answerYesto all prompts.
Export users
If you need to add multiple user accounts, you can do so by first exporting a.csvor.vebfile that contains the user information, and then importing that file.
- On the Users page, clickExport Usersat the bottom of the page. TheExport Usersdialog displays.
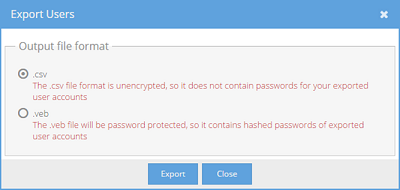
- Do one of the following:
- To export the user account data without corresponding passwords in the standard comma-separated value format, select .csv. For more information, see Export .csv files.
- To export the user account data along with corresponding hashed passwords in an encrypted and password-protected format, select .veb.
- ClickExport.
Export .csv files
When exporting a .csv file, the first line of the file is considered the header and is not imported as one of the added users. All .csv files must use UTF8 encoding.
The columns in the .csv file are as follows.
|
Column |
Description |
|---|---|
| User Type | Shows the various user types. You can import all types of users including admins, operators, VidyoRooms, executives, and legacy devices. However, when imported, they are all created as the Normal user type. |
| Username, Password,Fullname, andEmail | Provide details about the user. |
| Extension | Shows the user's unique extension. The extension values must be numeric values. |
| Group | Shows the provisioned group to which the user belongs. The groups must be defined before you can assign users to them. For more information about groups, contact Vidyo Support. |
| Language | Shows the two-letter language code for the user. |
| Description | Shows the optional information that may have been entered when the user was added. |
| Proxy | Shows the optional proxy to which the user has been assigned. |
| LocationTag | Shows the location tag to which the user has been assigned. |
Except forProxyandDescription, all user account fields are required when importing users.
Import users
If you need to add multiple user accounts, you can do so by importing a .csv or .veb file that contains the user information.
|
Note
|
- On the Users page, click Import Usersat the bottom of the page. TheImport Usersdialog displays.
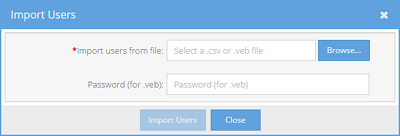
- ClickBrowse....
- Locate and open your .csv or .veb file.
- If you want to import a .veb file, enter a password to protect the .veb file bundle.
- ClickImport Users. A message displays confirming the number of imported users.