Tenant Admin: Configure Epic with VidyoConnect CAL
This section contains information to help you configure Epic with VidyoConnect Context-Aware Linking (CAL).
- Configure Epic Integration (and enter the Crypt Key)
- Configure the Epic Interconnect Server
- Generate an Epic CAL URL Link
- Change Epic Mode
- Download an API Usage Report
To use Epic integration as an on-premises customer, you must first ensure that the Super Admin has enabled it on the system level as described in Super Admin: Enable Epic integration.
If you are a cloud customer, you must complete the Tenant Admin steps below to configure your Epic integration. You can then perform the additional optional procedures on the Epic Integration page.
Configure Epic integration
- Log in to the Tenant Admin portal.
- On the top menu, click Settings.
- On the left panel, expand Feature Settings and click Epic Integration. The Epic Integration page displays.
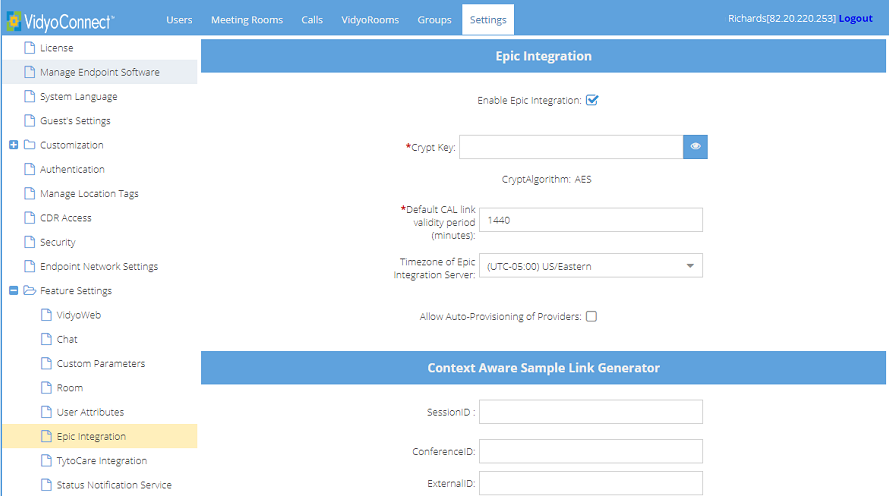
- Select the Enable EPIC Integration checkbox to enable Epic Integration and to enable the rest of the page options. (This checkbox will already be selected if you have an existing Epic integration).
- In Crypt Key, configure the Epic integration for the tenant by entering a 16-digit alphanumeric Crypt Key. (Previously, this was known as the "Shared Secret" key). The Crypt Key is the shared encryption key used to encrypt the query string in PATIENTOPENURL. The 16-digit crypt key can be manually created or you can use a key generator.
- Vidyo supports EPIC set external connection status through a web service which allows Hyperspace to properly reflect the video visit status of the Vidyo system in the provider schedule and connect visit navigator sections.
- You must enter the same Crypt Key in your Epic configuration. This key will be used for encrypting and decrypting the URL strings.
- The CryptAlgorithm: AES notation in the screen indicates that you must select AES as your encryption algorithm when configuring your Epic FDI record for CAL.
- Go to the Configure the Epic Interconnect Server procedure to troubleshoot any issues. Then, you can do one of the following:
- Click Save.
- Proceed to any of the following procedures:
- Generate an Epic CAL URL Link
- Change Epic Mode
- Download an API Usage Report
Generate a sample Epic CAL URL link
Input data in this next section to generate a sample Epic CAL URL link. For example, you can generate a link for a provider and patient to join a test conference call.
To troubleshoot issues, compare the sample URL extData with the extData generated from Epic and the test call.
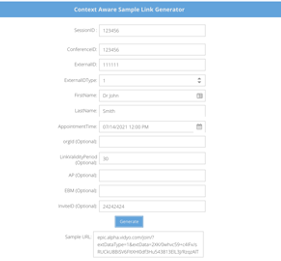
- In Session ID, enter any unique shared context ID identifier which is shared across users joining a single Vidyo session.
- In ConferenceID, enter the Epic Video Visit Conference ID (Encounter CSN).
- In ExternalID, enter the ID for the user.
- In ExternalIDType, select 1 for EMP, Provider or 2 for WPR, Patient.
- In FirstName, enter the first name of the person joining the conference.
- In LastName, enter the last name of the person joining the conference.
- In AppointmentTime (Optional), enter or select the scheduled time for the video visit in hours or minutes for your test conference (ex. HH:MM/AM/PM).
- Use Timestamp (Optional) to test Automatic Epic CAL link expiration for ad-hoc rooms.
- In orgid (Optional), if you are using multiple Epic Interconnect Servers, enter the Epic Interconnect/SetExternalConnectionStatus orgid. If you are only using one Epic Interconnect Server, leave blank.
- Use LinkValidityPeriod to test Automatic Epic CAL link expiration.
- Use AP to test Configure auto-provisioned providers.
- Use AllowMod to test Configure an auto-moderator PIN.
- Use EBM to test Configure auto-provisioned providers.
- Use InviteID to test Configure auto-invite of participants.
- Click Generate to generate the Epic CAL URL link. The test call link is generated in the Sample URL text box. You can copy this link to compare the generated extData from Epic's system to look for discrepancies. Alternatively, you can join this link in a browser to simulate a doctor or patient test call.
- Click Save.
Change the Epic mode
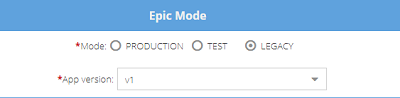
The default mode is Test.
- Under Epic Mode, select:
- Production when configuring and deploying in production. The Production Epic-Client-ID is sent for all API requests and is counted and billed by Epic.
- Test when configuring a lab environment which sends a Non-Production Epic-Client-ID for testing purposes only. Epic will NOT count these requests for billing purposes.
- Legacy when debugging and using systems running Epic version February 2019 and earlier. (In legacy mode, no Epic-Client-ID is sent so the system behaves exactly like VidyoPortal version 19.2.0 or earlier).
- Click Save.
Configure the Epic Interconnect Server
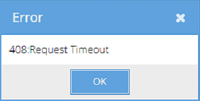
To troubleshoot any issues, the Tenant Admin must configure a connection test through the Epic Interconnect Server. The connection test generates helpful HTTP status notifications/codes such as 408 - Request Timeout, 404 - Not Found, 401 - Bad Credentials, etc.
The connection test will send a "400: Bad Request" message which is actually a "successful" connection test since the server expects a CONFERENCE-ID parameter that is intentionally missing.
To configure the Epic Interconnect Server:
- Click the plus next to the Notification button.
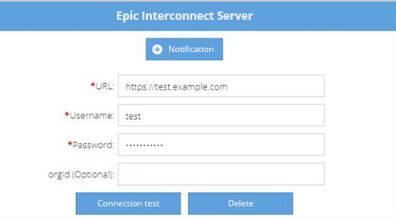
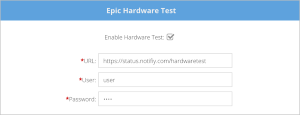
- In URL, enter the URL field provided by your Epic Technical Support.
- In Username enter the Epic Interconnect/SetExternalConnectionStatus user name. For example, "emp$" is a required prefix for username (e.g., emp$12345).
- In Password, enter the Epic Interconnect/SetExternalConnectionStatus password.
- If you are using multiple Epic Interconnect Servers, in orgid, enter the Epic Interconnect/SetExternalConnectionStatus orgid. in the orgid (Optional) field. If you are only using one Epic Interconnect Server, leave blank.
- Click Connection test. If there is an issue with connecting to the server, an Error dialog displays with an HTTP status notification/code and message such as in the example below.
- Click Save.
Download an API Usage Report
To download an API Usage Report, select a start and end date and then download the APIUSageLog.csv file which includes the following columns/data: ExternalUrl, Details, IsDelivered, CreateTime, UpdateTime, and EpicMode.
To download an API Usage Report:
- Select or enter start and end dates (YYYY/MM/DD) in the calendar to indicate how often API requests are made.
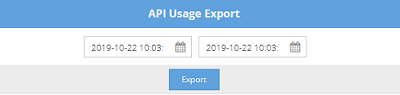
- Click Export. The system generates a spreadsheet in the lower left-hard corner of the screen for you to download.
- Click Save.
Separate configuration for Epic Hardware Test
- Administrators can now configure the Epic Hardware Test Interconnect server separately via the Tenant Admin.