Configure the Epic integration
This section contains information on how to configure your Epic integration.
- Prerequisites
- Demonstration of CAL
- Epic CAL feature compatibility with Vidyo versions
- Super Admin: Enable Epic integration (on-premises only)
- Tenant Admin: Configure Epic with VidyoConnect CAL
- Automatic join via browser
- Custom data in Vidyo CDR
- URL parameter: skipBrowserCheck
- Automatic Epic CAL link expiration
- Automatic Epic CAL link expiration for ad-hoc rooms
- Configure auto-provisioned providers
- Configure auto-invite of participants
- Play content or display a custom background in a waiting room
- Configure Epic Save Media integration
- Configure and use an auto-moderator PIN
Prerequisites
If you want to use an on-premises Epic integration, you must first enable it in the Super Admin. If you are a cloud customer, your Epic integration will already be enabled.
Both on-premises and cloud customers need to configure Epic integration in the Tenant Admin for each tenant that's going to use this integration. Alternatively, you can enable it via REST APIs. For information about how to configure it via the REST APIs, see EPIC Integration REST Services under VidyoPlatform.
|
Note If you need to enable context aware linking on Epic, select this link https://galaxy.epic.com/?#Browse/page=1!68!50!1621949,3769901, and then log in with your credentials. |
Follow the applicable below prerequisites to ensure a smooth transition with your Epic integration. Verify versions, compatibility and ensure that you have the proper Epic security updates installed on your epic environment prior to upgrading to Vidyo.
- Starting with the Epic February 2019 release, Epic requires the inclusion of an Epic-Client-ID for all third-party integrations that use their APIs.
- Only VidyoPortal version 19.3.0 and later supports the Epic CAL integration through Epic's App Orchard marketplace and will send this Epic-Client-ID whenever the SetExternalConnectionStatus API is called.
- Ensure that you've applied Security Update 21 to both the VidyoPortal and VidyoRouter running version 18.4.0 or later. Only use this integration with:
- VidyoConnect Desktop 19.4.1 or later (latest version) or 18.2.0 (minimum version)
- VidyoConnect Mobile 19.4.0 or later (latest version) or 18.1.0 (minimum version).
- VidyoConnect Room SE 21.1.0 or later
|
Note To use Epic CAL integration with VidyoConnect Room SE, ensure that the VidyoConnect desktop application is NOT installed on the same machine. If the VidyoConnect desktop application and the VidyoConnect Room application are installed on the same machine, when the Epic CAL URL is opened, the Download button will display based on the VidyoPortal configuration, and when selected, it will download the VidyoConnect desktop application rather than the VidyoConnect Room application. |
Demonstration of CAL
To view a demonstration of CAL in action hosted on Epic's galaxy site, select this link https://eventarchive.epic.com/telehealth/Vidyo%20CAL%20Demo.mp4. You may need to obtain special login permissions to view this demo.
Epic CAL feature compatibility with Vidyo versions
The following table lists the Vidyo and Epic App Market App versions required for each Epic CAL feature.
|
Epic CAL feature |
Vidyo Infrastructure (VidyoPortal & VidyoRouter) |
Vidyo Epic Service |
VidyoConnect for Desktop |
VidyoConnect for WebRTC |
VidyoConnect for Android |
VidyoConnect for iOS |
Epic App Market App |
|---|---|---|---|---|---|---|---|
| Automatic join via browser |
22.2.0 or later |
22.2.0 or later |
22.1.0 or later |
21.5.1 or later |
Not supported |
Not supported |
2.0 or later |
|
Custom data in Vidyo CDR |
24.1.0 |
N/A |
N/A |
N/A |
N/A |
N/A |
N/A |
| Automatic Epic CAL link expiration |
22.2.0 or later |
22.2.0 or later |
22.1.0 or later |
21.5.1 or later |
Not supported |
Not supported |
2.0 or later |
| Automatic Epic CAL link expiration for ad-hoc rooms |
22.3.1 or later |
22.2.0 or later |
22.1.0 or later |
21.5.1 or later |
Not supported |
Not supported |
2.0 or later |
| Auto-provisioned providers |
21.2.0 or later |
22.2.0 or later |
22.1.0 or later |
21.5.1 or later |
Not supported |
Not supported |
2.0 or later |
| Auto-invite of participants |
22.2.0 or later |
22.2.0 or later |
22.1.0 or later |
21.5.1 or later |
Not supported |
Not supported |
2.0 or later |
| Play content or display a custom background in a waiting room |
21.4.0 or later |
22.2.0 or later |
21.5.0 or later |
21.4.0 or later |
21.6.0 or later |
21.6.0 or later |
2.0 or later |
| Epic Save Media integration |
22.2.0 or later |
22.2.0 or later |
22.1.0 or later |
21.5.1 or later |
Not supported |
Not supported |
2.0 or later |
|
Auto-moderator PIN |
22.2.0 or later |
22.2.0 or later |
22.2.0 or later |
22.2.0 or later |
Not supported |
Not supported |
2.0 or later |
Super Admin: Enable Epic integration (on-premises only)
On-premise only.
|
Note For this configuration to work, the Scheduled Room feature must be enabled on the VidyoPortal. If you do not have this feature enabled; you will receive a 404 error message stating, This is not a valid room link. |
- Log in to the Admin portal using your Super Admin account.
- On the top menu, click Settings.
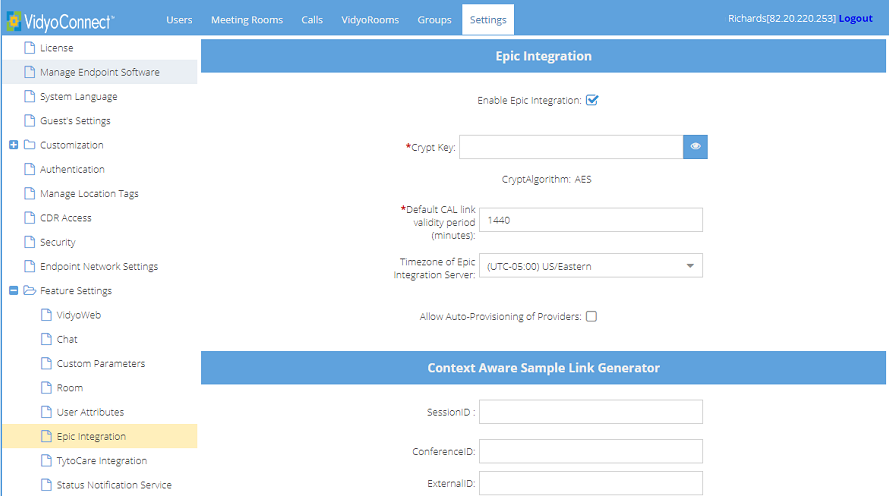
- On the left panel, expand Feature Settings and click Epic Integration. The Epic Integration page displays.
- Select the Enable Epic Integration check box.
- Click Save.
Tenant Admin: Configure Epic with VidyoConnect CAL
This section contains information to help you configure Epic with VidyoConnect Context-Aware Linking (CAL).
- Configure Epic Integration (and enter the Crypt Key)
- Configure the Epic Interconnect Server
- Generate an Epic CAL URL Link
- Change Epic Mode
- Download an API Usage Report
To use Epic integration as an on-premises customer, you must first ensure that the Super Admin has enabled it on the system level as described in Super Admin: Enable Epic integration.
If you are a cloud customer, you must complete the Tenant Admin steps below to configure your Epic integration. You can then perform the additional optional procedures on the Epic Integration page.
Configure Epic integration
- Log in to the Tenant Admin portal.
- On the top menu, click Settings.
- On the left panel, expand Feature Settings and click Epic Integration. The Epic Integration page displays.
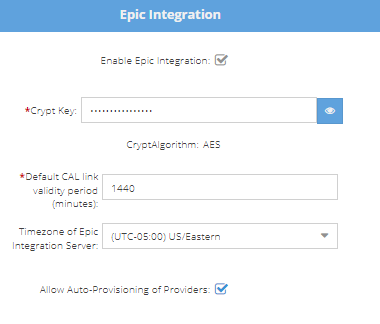
- Select the Enable EPIC Integration checkbox to enable Epic Integration and to enable the rest of the page options. (This checkbox will already be selected if you have an existing Epic integration).
- In Crypt Key, configure the Epic integration for the tenant by entering a 16-digit alphanumeric Crypt Key. (Previously, this was known as the "Shared Secret" key). The Crypt Key is the shared encryption key used to encrypt the query string in PATIENTOPENURL. The 16-digit crypt key can be manually created or you can use a key generator.
- Vidyo supports EPIC set external connection status through a web service which allows Hyperspace to properly reflect the video visit status of the Vidyo system in the provider schedule and connect visit navigator sections.
- You must enter the same Crypt Key in your Epic configuration. This key will be used for encrypting and decrypting the URL strings.
- The CryptAlgorithm: AES notation in the screen indicates that you must select AES as your encryption algorithm when configuring your Epic FDI record for CAL.
- Go to the Configure the Epic Interconnect Server procedure to troubleshoot any issues. Then, you can do one of the following:
- Click Save.
- Proceed to any of the following procedures:
- Generate an Epic CAL URL Link
- Change Epic Mode
- Download an API Usage Report
Generate a sample Epic CAL URL link
Input data in this next section to generate a sample Epic CAL URL link. For example, you can generate a link for a provider and patient to join a test conference call.
To troubleshoot issues, compare the sample URL extData with the extData generated from Epic and the test call.
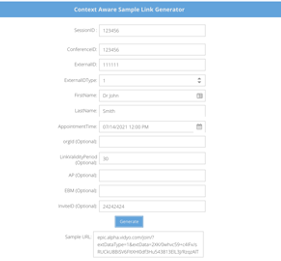
- In Session ID, enter any unique shared context ID identifier which is shared across users joining a single Vidyo session.
- In ConferenceID, enter the Epic Video Visit Conference ID (Encounter CSN).
- In ExternalID, enter the ID for the user.
- In ExternalIDType, select 1 for EMP, Provider or 2 for WPR, Patient.
- In FirstName, enter the first name of the person joining the conference.
- In LastName, enter the last name of the person joining the conference.
- In AppointmentTime (Optional), enter or select the scheduled time for the video visit in hours or minutes for your test conference (ex. HH:MM/AM/PM).
- Use Timestamp (Optional) to test Automatic Epic CAL link expiration for ad-hoc rooms.
- In orgid (Optional), if you are using multiple Epic Interconnect Servers, enter the Epic Interconnect/SetExternalConnectionStatus orgid. If you are only using one Epic Interconnect Server, leave blank.
- Use LinkValidityPeriod to test Automatic Epic CAL link expiration.
- Use AP to test Configure auto-provisioned providers.
- Use AllowMod to test Configure an auto-moderator PIN.
- Use EBM to test Configure auto-provisioned providers.
- Use InviteID to test Configure auto-invite of participants.
- Click Generate to generate the Epic CAL URL link. The test call link is generated in the Sample URL text box. You can copy this link to compare the generated extData from Epic's system to look for discrepancies. Alternatively, you can join this link in a browser to simulate a doctor or patient test call.
- Click Save.
Change the Epic mode
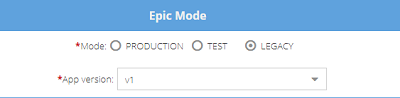
The default mode is Test.
- Under Epic Mode, select:
- Production when configuring and deploying in production. The Production Epic-Client-ID is sent for all API requests and is counted and billed by Epic.
- Test when configuring a lab environment which sends a Non-Production Epic-Client-ID for testing purposes only. Epic will NOT count these requests for billing purposes.
- Legacy when debugging and using systems running Epic version February 2019 and earlier. (In legacy mode, no Epic-Client-ID is sent so the system behaves exactly like VidyoPortal version 19.2.0 or earlier).
- Click Save.
Configure the Epic Interconnect Server
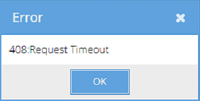
To troubleshoot any issues, the Tenant Admin must configure a connection test through the Epic Interconnect Server. The connection test generates helpful HTTP status notifications/codes such as 408 - Request Timeout, 404 - Not Found, 401 - Bad Credentials, etc.
The connection test will send a "400: Bad Request" message which is actually a "successful" connection test since the server expects a CONFERENCE-ID parameter that is intentionally missing.
To configure the Epic Interconnect Server:
- Click the plus next to the Notification button.
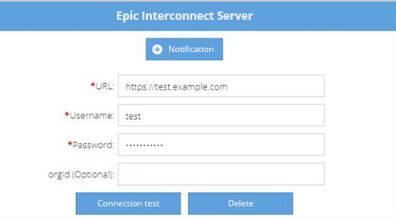
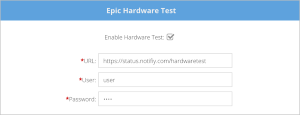
- In URL, enter the URL field provided by your Epic Technical Support.
- In Username enter the Epic Interconnect/SetExternalConnectionStatus user name. For example, "emp$" is a required prefix for username (e.g., emp$12345).
- In Password, enter the Epic Interconnect/SetExternalConnectionStatus password.
- If you are using multiple Epic Interconnect Servers, in orgid, enter the Epic Interconnect/SetExternalConnectionStatus orgid. in the orgid (Optional) field. If you are only using one Epic Interconnect Server, leave blank.
- Click Connection test. If there is an issue with connecting to the server, an Error dialog displays with an HTTP status notification/code and message such as in the example below.
- Click Save.
Download an API Usage Report
To download an API Usage Report, select a start and end date and then download the APIUSageLog.csv file which includes the following columns/data: ExternalUrl, Details, IsDelivered, CreateTime, UpdateTime, and EpicMode.
To download an API Usage Report:
- Select or enter start and end dates (YYYY/MM/DD) in the calendar to indicate how often API requests are made.
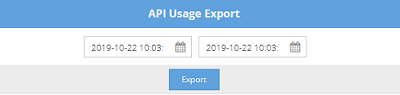
- Click Export. The system generates a spreadsheet in the lower left-hard corner of the screen for you to download.
- Click Save.
Separate configuration for Epic Hardware Test
- Administrators can now configure the Epic Hardware Test Interconnect server separately via the Tenant Admin.
Automatic join via browser
This section contains information on how to automatically join via browser.
Vidyo supports an optional URL parameter that, when added to the URL of a CAL link, automatically invokes the Join via the browser workflow, bypassing the screen that asks participants to either Join via the app or Join via the browser.
Terminology
Before configuring advanced workflows, ensure you are familiar with the terms in the following table.
|
Term |
Description |
|---|---|
|
AppointmentTime |
This is a field in the encrypted CRYPTSTRING of an Epic CAL link that indicates the date and time of an appointment. Note The time zone is not sent to Vidyo in this field and therefore needs to be configured at the Tenant Admin level. |
|
CAL link validity period |
This is the number of minutes that a CAL link is valid from the start of the AppointmentTime. Note There is a hard-coded 30-minute grace period BEFORE an AppointmentTime starts, but the link expires immediately after the validity period ends. |
|
LinkValidityPeriod parameter |
This optional parameter, which can be included in the encrypted CRYPTSTRING, can be used to override the Default CAL link validity period for an individual CAL link. |
|
Timezone of Epic Integration Server |
This is the time zone that your Epic system resides in. That is, it is the time zone your system schedules appointments in. |
|
Default CAL link validity period |
This is the number of minutes that a CAL link is valid from the start of the AppointmentTime if the LinkValidityPeriod parameter is not specified or is invalid. |
|
Timestamp |
This is a field in the encrypted CRYPTSTRING of an Epic CAL link that indicates the current time in the UNIX time format (in seconds). |
Prerequisites
For the required component versions for this feature, see Epic CAL feature compatibility with Vidyo versions.
This feature requires:
- VidyoConnect WebRTC enabled on your Tenant
- Native WebRTC deployment for mobile WebRTC workflows
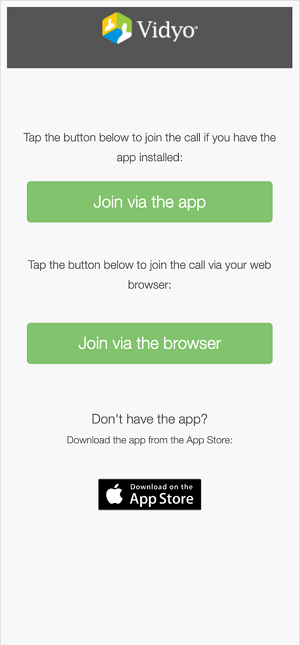
If a participant does not meet the WebRTC or VidyoPortal requirements, the standard splash screen that enables participants to “Join via the app” or “Join via the browser” displays. The desktop and mobile versions of this screen are shown below:
VidyoConnect desktop application:
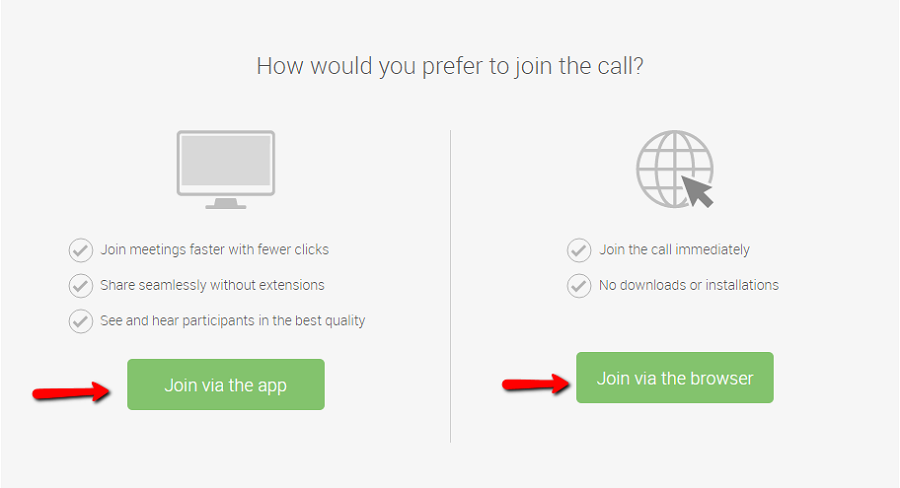
VidyoConnect mobile application (iOS and Android):
|
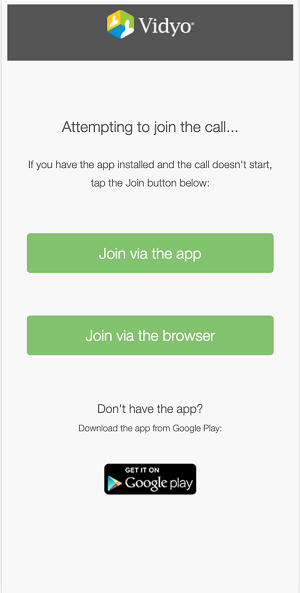
|
Use the jvw parameter
The URL parameter that invokes the workflow where participants automatically join via the browser is the jvw parameter. As shown in the following table, values for this parameter include 0, which invokes the standard workflow that displays the “Join via the app” and “Join via the browser” splash screen, or 1, which automatically invokes the “Join via the browser” workflow.
|
Parameter |
Value |
|---|---|
|
jvw |
0—default, which displays the standard splash screen. Using 0 is equivalent to not specifying the parameter in the URL. 1—automatically invokes the “Join via the browser” workflow. |
Here is an example of a link in an FDI record that uses the jvw parameter (with an added line break for legibility):
https://epic.alpha.vidyo.com/join/?extDataType=1
&extData=%CRYPTSTR%&jvw=1
|
Note
|
Custom data in Vidyo CDR
Using the Epic Context Aware Linking (CAL) integration, FDI records can be configured to send additional data in their CAL links that will automatically populate into the participant’s CDR record.
Prerequisites
For the required component versions for this feature, see Epic CAL feature compatibility with Vidyo versions.
Using CustomField Parameters
The Custom Data parameters need to be placed inside the Epic CAL link as a part of the encrypted extData. For example, if there are two fields you want to capture in the Vidyo CDR:
- Department
- Location
You can update your FDI record’s CRYPTSTRING as in the below example:
SessionID=10007057852&ConferenceID=10007057852
&ExternalID=+165790&ExternalIDType=1
&FirstName=Krishnan&LastName=Ram
&Timestamp=1647925975&LinkValidityPeriod=60
&CustomData1=Pediatrics&CustomData2=Hackensack
In the above example, CustomData1=Pediatrics and CustomData2=Hackensack are explicitly specified. These values can be replaced with variables, such as %LOCATION% and %DEPARTMENT% for example. When this is done, they will be automatically populated in your Epic CAL’s link context within your Epic instance. Your Epic TS will be able to guide you on the exact mnemonic to for your use case.
Viewing the CDR
When an Epic CAL link has been invoked with the above CRYPTSTRING, the CustomData fields are automatically recorded into the CDR. See below for example of a CDR excerpt:

Best Practices
Here are a few best practices when using this feature:
- Keep your CustomData fields consistent. The Vidyo CDR will record what you send in the specified fields. For example, it does not know that CustomData1 corresponds to Department in your Epic FDI record. If you start sending it as CustomData2, then it will use that field instead.
- There is currently a maximum of 10 CustomData fields. If more fields are necessary, please reach out to your Vidyo representative.
- The Vidyo CDR will record the CustomData as is (with exception to some input sanitization security checks). If you do not want certain data to be saved in the Vidyo CDR, do not send it in the Epic CAL link.
URL parameter: skipBrowserCheck
Using the Epic Context Aware Linking (CAL) integration, FDI records can be configured to send an additional parameter in their CAL links that will bypass VidyoPortal’s WebRTC browser check.
In most embedded browser use cases on Android and iOS, the browser’s User-Agent can be customized to the original application’s specifications. In these cases, the VidyoPortal may not recognize the browser as one that support WebRTC and thus not present the option to Join via Browser. When the skipBrowserCheck=1 parameter is present in the URL, the VidyoPortal and VidyoConnect for WebRTC application will bypass this check and always present the Join via Browser option.
Prerequisites
For the required component versions for this feature, see Epic CAL feature compatibility with Vidyo versions.
Using the parameter
The skipBrowserCheck URL parameter need to be placed outside the Epic CAL CRYPTSTRING as a part of the room link URL.
| Parameter | Value |
| skipBrowserCheck |
0 — default, which displays the standard splash screen. Using 0 is equivalent to not specifying the parameter in the URL. 1 — bypasses the VidyoPortal check and always shows the Join via Browser option. This parameter is then automatically pass along to the VidyoConnect for WebRTC app. |
Here is an example of a link in an FDI record that uses the jvw parameter:
https://epic.alpha.vidyo.com/join/?extDataType=1&extData=%CRYPTSTR%&skipBrowserCheck=1
Best practices
Here are a few best practices when using this feature:
- If a room link with the skipBrowserCheck parameter is invoked on a browser that does not support WebRTC, the user will fail to join the conference. Vidyo makes a best effort to only show this option for browsers that are generally modern – but every possible combination cannot be tested.
- Vidyo does not validate custom User-Agents for all possible embedded applications. This is up to the implementation team to validate in their user case.
Automatic Epic CAL link expiration
This section contains information on the Epic CAL link expiration process.
Vidyo offers extra security for your generated Epic CAL links by allowing integrators to set expiration periods for the links. This is an optional configuration that is disabled by default and should be configured in conjunction with your Epic FDI record.
Prerequisites
For the required component versions for this feature, see Epic CAL feature compatibility with Vidyo versions.
Configure your tenant
To configure the default CAL link validity period and time zone of the Epic Integration Server:
- Log in to the Admin portal using your Admin account.
- On the top menu, click Settings.
- On the left panel, expand Feature Settings and click Epic Integration. The Epic Integration page displays.
- Select the Enable EPIC Integration checkbox if it’s not already selected.
- In Default CAL link validity period (minutes), enter the duration in minutes that your Epic CAL links will be valid. Once that time period has passed, the links will expire. For example, if you enter 15 minutes, your CAL links will be valid for only 15 minutes after the AppointmentTime.
- In Timezone of Epic Integration Server, select the time zone where the Epic server is located.
- Click Save.
Add the LinkValidityPeriod parameter to the CRYPTSTRING
The LinkValidityPeriod is an optional CAL link parameter that allows Epic integrations specify a link validity period on a per link basis.
|
Parameter |
Value |
|---|---|
|
LinkValidityPeriod |
0—indicates no expiration 1 to 43,200—number of minutes after AppointmentTime that the Epic CAL link is valid |
The LinkValidityPeriod must be included inside the CRYPTSTRING as part the encrypted extData that is passed to Vidyo from the Epic FDI record.
Here is an example of a decrypted CRYPTSTRING with the LinkValidityPeriod parameter set for a 60-minute expiration period (with added line breaks for legibility):
SessionID=10007057852&ConferenceID=10007057852
&ExternalID=+165790&ExternalIDType=1
&FirstName=Krishnan&LastName=Ram
&AppointmentTime=08/11/2020 02:00 PM
&LinkValidityPeriod=60
|
Note
|
Test
Use the Context Aware Sample Link Generator in the Admin portal to generate a sample Epic CAL URL link with the LinkValidityPeriod parameter.
Automatic Epic CAL link expiration for ad-hoc rooms
This section contains information for the automatic expiration of links for ad-hoc rooms.
- Prerequisites
- Configure your tenant and add the LinkValidityPeriod parameter
- Add the Timestamp parameter to the CRYPTSTRING
- Test
With the current Epic CAL Integration, the extData can include an optional AppointmentTime parameter to handle link expiration for scheduled visits. However, this does not work for ad-hoc scheduling, the Epic mnemonic used for scheduled visits—%EXTENSION;15354%—returns nothing when used for ad-hoc scheduling.
To handle this use case, Vidyo has added the Timestamp parameter. This parameter allows for setting the current time as the start of the linkValidityPeriod (in UNIX time format). It is an optional configuration that is disabled by default and should be configured in conjunction with your Epic FDI record.
Prerequisites
For the required component versions for this feature, see Epic CAL feature compatibility with Vidyo versions.
Configure your tenant and add the LinkValidityPeriod parameter
Follow the instructions in Automatic Epic CAL link expiration to:
- Configure the default CAL link validity period and time zone of the Epic Integration Server in the Tenant Admin.
- Add the LinkValidityPeriod parameter to the CRYPTSTRING
Add the Timestamp parameter to the CRYPTSTRING
The Timestamp is an optional CAL link parameter that allows Epic integrations to specify a link validity period on a per-link basis.
|
Parameter |
Value |
|---|---|
|
Timestamp |
Unix timestamp in seconds |
The Timestamp must be included inside the CRYPTSTRING as part the encrypted extData that is passed to Vidyo from the Epic FDI record.
Here is an example of a decrypted CRYPTSTRING with the LinkValidityPeriod parameter set for a 60-minute expiration period (with added line breaks for legibility):
SessionID=10007057852&ConferenceID=10007057852
&ExternalID=+165790&ExternalIDType=1
&FirstName=Krishnan&LastName=Ram
&Timestamp=1647925975&LinkValidityPeriod=60
Test
Use the Context Aware Sample Link Generator in the Tenant Admin to generate a sample Epic CAL URL link with the Timestamp parameter.
Configure auto-provisioned providers
This section contains information on how to configure auto-provisioned providers.
- Prerequisites
- Terminology
- Configure your tenant
- Add endpoint behaviors
- Add the parameters to the CRYPTSTRING
- Test
Using Vidyo’s Epic Context-Aware Linking (CAL) integration, providers can now be automatically provisioned into their Tenant as registered users. This allows these users to automatically inherit ownership of their Epic CAL conferences and thereby receive moderation rights which enables them to:
- Mute and unmute participants
- Disconnect participants
- Invite other users via links
- Invite other registered users to the conference
- Dial out to SIP or H.323 devices
|
Note Each auto-provisioned provider consumes a Seat license. |
Prerequisites
For the required component versions for this feature, see Epic CAL feature compatibility with Vidyo versions.
|
Note This feature requires available Seat licenses on your tenant. |
Terminology
Before configuring this feature, ensure you are familiar with the terms in the following table.
|
Term |
Description |
|---|---|
|
ExternalID |
This is a mandatory field in the encrypted CRYPTSTRING of an Epic CAL link that denotes the ID for the user (EMP ID, Provider or WPR ID, Patient). This field is used to uniquely identify a provider and gets provisioned into your Tenant. This field is populated by Epic and must be alphanumeric. |
|
Auto-Provisioning Parameter |
This is a field in the encrypted CRYPTSTRING of an Epic CAL link that denotes whether Auto-Provisioning (AP) is to be performed for this user. When set to 0 (default), auto-provisioning is disabled; when set to 1 auto-provisioning is enabled. It will only be honored for providers and if Auto-Provisioning is enabled at the Tenant level. |
|
Endpoint Behavior Mode |
This is an optional parameter in the encrypted CRYPTSTRING of an Epic CAL link that denotes an Endpoint Behavior Mode profile. This field can be used to customize the behavior of an endpoint when using this feature. For example, it can be used to specify if a provider will be logged out automatically after their Epic CAL conference. |
Configure your tenant
- Log in to the Tenant Admin using your Admin account.
- On the top menu, click Settings.
- On the left panel, expand Feature Settings and click Epic Integration. The Epic Integration page displays
- Select the Allow Auto-Provisioning of Providers checkbox.
Add endpoint behaviors
For information about how to add Endpoint Behaviors via Vidyo's REST APIs, see the Endpoint Behavior Mode API under VidyoPlatform.
To support Endpoint Behavior Mode, you must have Custom Roles enabled on your tenant:
- For VidyoCloud customers, this can be enabled on demand. To do so, open a ticket with VidyoCloud Support.
Add the parameters to the CRYPTSTRING
The following parameters are used by the Auto-Provisioned Provider feature.
|
Parameter |
Value |
|---|---|
|
AP (string) |
(values must be included inside the encrypted CRYPTSTRING). |
|
EBM (string) |
Specifies the Endpoint Behavior Mode label to be used for the Epic CAL link (must be set up prior to being used via the REST API). |
For your Epic FDI record, you need to add the parameters listed in the table above. Note that EBM is optional.
Here is an example of a decrypted CRYPTSTRING (with added line breaks for legibility):
SessionID=10007057852&ConferenceID=10007057852
&ExternalID=165790&ExternalIDType=1
&FirstName=John&LastName=Smith
&AppointmentTime=08/11/2020 02:00 PM
&LinkValidityPeriod=60&AP=1&EBM=ap
Test
Use the Context Aware Sample Link Generator in the Tenant Admin to generate a sample Epic CAL URL link with the APand EBMparameters.
Configure auto-invite of participants
Using Vidyo’s Epic Context-Aware Linking (CAL) integration, providers can now invite other participants automatically by invoking a link using a new parameter. By including the parameter inviteID=<entityID> into the Epic CAL CRYPTSTRING, the VidyoPortal will automatically invite that participant into the Epic CAL conference.
Invitees can be:
- VidyoConnect registered users
- VidyoRoom registered users
- Custom endpoints based on VidyoClient
Prerequisites
For the required component versions for this feature, see Epic CAL feature compatibility with Vidyo versions.
Add the InviteID parameter to the CRYPTSTRING
The InviteID is an optional CAL link parameter that allows Epic integrations to invite a user into a conference using their entityID.
|
Parameter |
Value |
|---|---|
|
InviteID |
Numeric entityID (obtained via SOAP API request on VidyoPortal) |
The InviteID parameter must be included inside the CRYPTSTRING as part the encrypted extData that is passed to Vidyo from the Epic FDI record.
Here is an example of a decrypted CRYPTSTRING with the InviteID parameter (with added line breaks for legibility):
SessionID=10007057852&ConferenceID=10007057852
&ExternalID= 165790&ExternalIDType1
&FirstName=Krishnan&LastName=Ram
&AppointmentTime= 08/11/2020 02:00 PM
&LinkValidityPeriod=60&AP=1&EPB=e1&InviteID=209476
Invitees must be online and not in a conference—just as one would need to be to receive a call invite.
directDial versus InviteID parameters
There are some similarities between the directDial and InviteID parameters, but there are some key differences that are important to note.
| Item |
directDial Parameter |
InviteID Parameter |
|---|---|---|
|
Parameter location |
Outside of CRYPTSTRING |
Inside of CRYPTSTRING |
|
User type |
Registered user only |
Guest or registered user |
|
Room |
Uses ad-hoc Room |
Uses Epic CAL-generated room (CSN-based) |
|
Epic notification |
No Epic notification |
Triggers Epic SetExternalConnectionStatus API |
|
Disconnection |
Auto-disconnect of invitee when call hangs up (standard P2P flow) |
Does not auto-disconnect invitee when call hangs up |
Test
Use the Context Aware Sample Link Generator in the Tenant Admin to generate a sample Epic CAL URL link with the InviteID parameter.
Play content or display a custom background in a waiting room
This section contains information on how to play content or display a custom background in a waiting room.
- Prerequisites
- Media files
- Parameters
- Configure your tenant
- Add the parameters to your Epic CAL working link
- Test
Healthcare customers using Epic CAL can now play music, display a background, or show a video to patients who are waiting for their healthcare providers to join their VidyoConnect call. You can customize this feature so that the patients in the waiting room can:
- Listen to audio (with or without a background image)
- See a background image (with or without audio)
- View a video
Providers can specify the audio, background image, or video content to be played in the waiting room. They can also select different content for different calls.
Prerequisites
For the required component versions for this feature, see Epic CAL feature compatibility with Vidyo versions.
Media files
To play audio or video files or display a background for your VidyoConnect users, you must use the following media formats:
- Audio content: .ogg or .mp3 format
- Background content: .png or .jpg format
- Video content: .mp4 or .webm (vp8) format
Audio and video content
For audio and video content, the media files for each format must have the same name and be stored in the same location.
For example, if you have an audio file called waitingthat you want to play to VidyoConnect users on both Windows and Mac, you must save the file as both waiting.mp3 and waiting.ogg and store both files in the same location, such as:
- https://cv-workshop.herokuapp.com/test/waiting.mp3
- https://cv-workshop.herokuapp.com/test/waiting.ogg
Despite having to store both file types for audio and video content, Tenant Admins only have to specify one file type in the Value field on the Settings > Feature Settings > Custom Parameters page. Provided both the .mp3 and the .ogg file types are in the same location, both Windows and Mac users will be able to hear the audio file.
Background content
For background content, only one format needs to be stored. For example, if you store a waiting.png file, you don't also have to store a waiting.jpgfile. Both Windows and Mac users will be able to access .png files as well as .jpg files.
Parameters
The following parameters control whether VidyoConnect users hear audio, view a background, or see a video while in a waiting room.
|
Parameter |
Value |
|---|---|
|
wrac |
Controls whether audio content is played in the waiting room while users wait for the physician to join the VidyoConnect call. |
|
wrbc |
Controls whether background content is displayed in the waiting room while users wait for the physician to join the VidyoConnect call. |
|
wrvc |
Controls whether video content is played in the waiting room while users wait for the physician to join the VidyoConnect call. |
The Tenant Admin must add and configure these custom parameters as described below.
Configure your tenant
To configure your tenant:
- Log in to the Tenant Admin using your Admin account.
- On the top menu, click Settings.
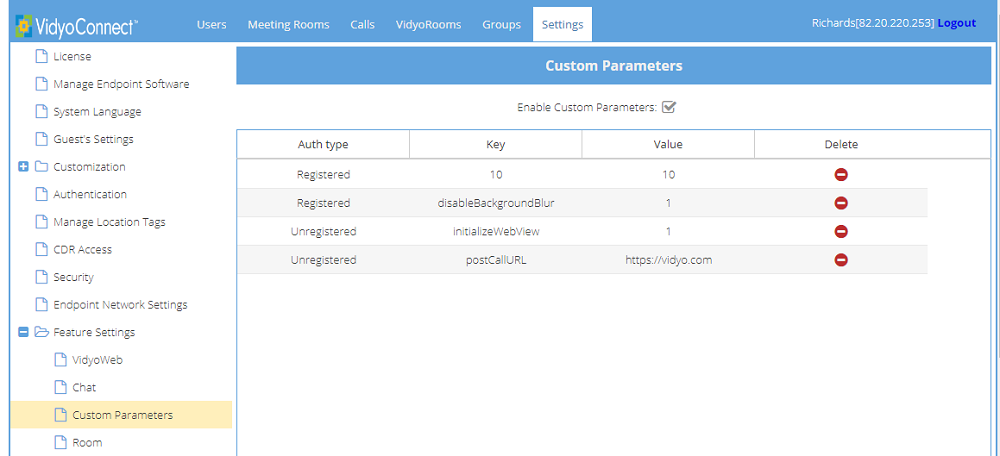
- On the left panel, expand Feature Settings and click Custom Parameters.
- Select the Enable Custom Parameters checkbox and click Save.
- At the bottom of the page, click Add Custom Parameters . The Add Custom Parameters dialog displays.
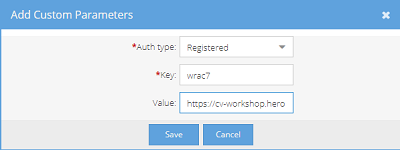
- In Auth type, select whether registered or unregistered (guest) users will be able to use the URL. If you want both types of users to have access, you can add a custom parameter for each type.
- In Key, type wrac# to play audio in the waiting room, type wrbc# to display a background in the waiting room, or type wrvc# to play a video in the waiting room.
|
Note The # can be any number; however, it must match the configuration parameter entered in the Epic CAL working link. For example, if you enter wrac7 in the Key field, your Epic link must include wrac=7. |
- In Value, type the path of the audio, background, or video content. For details, see Media files.
- Click Save. The Auth Type, Key, and Value you configured appear on the Custom Parameters list.
Add the parameters to your Epic CAL working link
Add the parameters as described in Invoke VidyoConnect with parameters.
|
Note The wrac, wrbc, and wrvc parameters must be outside the Epic CAL CRYPTSTRING. |
The value used for the parameter must match the parameter entered in the Key field on the Tenant Admin Settings > Feature Settings > Custom Parameters page. For example, if wrac7 is entered in the Key field, you must use wrac=7 in your Epic CAL working link.
Here is an example (with added line breaks for legibility):
https://neo.alpha.vidyo.com/join/?
extDataType=1
&extData=G3Lr2u8kEn9oKjduv
NzVO0YPeNgpJlZRIWw9uD6i2y+O/dui5dzS6EN+
V6CfPPfS2xDahUpcEqs2Jzww0OB8+QgGNzXYQXGuYcm
37BZjM4YOP3/ZKCbFXwn4B3L5yhebctyZV6dIn0NkR
IZL0Erx3N9cAlgCin5R+/Q3X0QKL
+P7Nq4wMPX4Jthk1A6F2QCa&wrac=7
This link would invoke VidyoConnect with the following custom invocation parameters (with added line breaks for legibility):
vidyo://join?portal=
https://neo.alpha.vidyo.com
&f=RzpJUENPOklQQ0k6TW9kOlRMUzpMQjpXQjpQQzpQd
WJDOkNEUjpFUDpDUDp SUEk6QkE6TkRDOkNQUjpPQToy
MjA6VEM6UFI6U1IyOlNSOlRQ
&roomKey=4IAK6esU&extData=G3Lr2u8kEn9oKjduv
NzVO0YPeNgpJlZRIWw9uD6i2y%20O/dui5dzS6EN%
20V6CfPPfS2xDahUpcEqs2Jzww0OB8%20QgGNzXYQX
GuYcm37BZjM4YOP3/ZKCbFXwn4B3L5yhebctyZV6dIn
0NkRIZL0Erx3N9cAlgCin5R%20/Q3X0QKL%20P7Nq4w
MPX4Jthk1A6F2QCa
&extDataType=1&pin=false
&dispName=Petro%20Epic%20Waiting&wrac=7
Test
Use the Context Aware Sample Link Generator in the Tenant Admin to generate a sample Epic CAL URL link.
Configure Epic Save Media integration
This section contains information on how to configure your Epic Save Media integration.
- Prerequisites
- App Market requirements
- Configure your Epic environment
- Configure your tenant
- Update your FDI record for LaunchToken
- Test
Vidyo supports a direct integration with Epic whereby providers using VidyoConnect can take a snapshot of what a patient is showing to the camera and have that snapshot automatically saved into that patient’s chart.
To enable this functionality, Vidyo has added support for the SMART of FHIR integration with Epic. This requires deploying the Vidyo Epic Service.
Prerequisites
For the required component versions for this feature, see Epic CAL feature compatibility with Vidyo versions.
This integration requires the Vidyo Epic Service:
- If you are a VidyoCloud customer, this will be set up for you automatically.
- If you are an On-Premise customer, you need to deploy and configure this component by following the instructions in Deploy Vidyo Epic Service. You must also enable the Auto-Provisioned Provider feature on your tenant. For more information, see Configure auto-provisioned providers.
|
Note We highly recommend that you configure this integration on a test tenant before you update your production tenant. |
App Market requirements
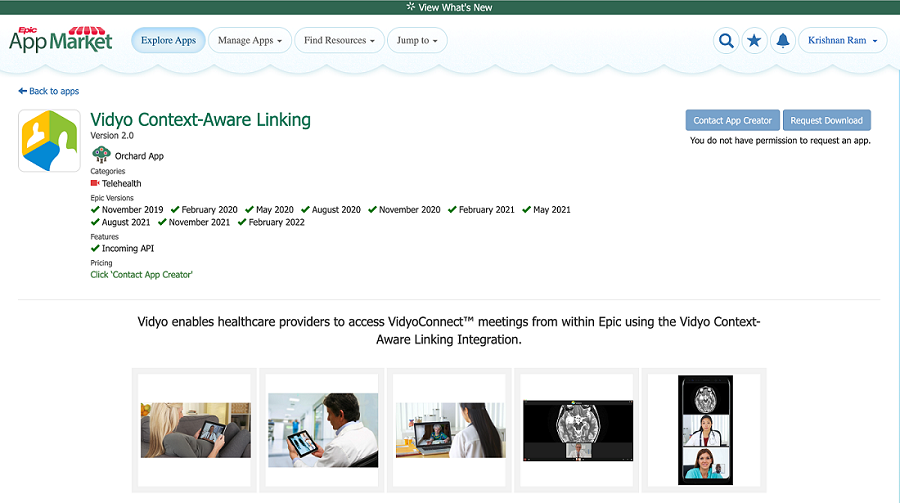
If you are currently using the Vidyo Context-Aware Linking version 1.0 in Epic App Market, to use the client-IDs that support SMART on FHIR and Save Media, you need to request access to the updated Vidyo Context Aware Linking version 2.0 App via Epic App Market.
- Log into https://appmarket.epic.com.
- Search for the Vidyo Context-Aware Linking app.
- Click Request Download.
- Vidyo will get a notification of this request and usually withing 24-48 hours it will be approved. If it is not approved, please create a ticket with Vidyo Support.
|
Note Not all App Market users have permissions to request an updated or new app. Please reach out to your Epic TS for information on who in your organization has the appropriate permissions. |
Configure your Epic environment
- To set up Save Media, you need to set up Context-Aware Linking (OAuth3 approach) in your Epic environment. Instructions to do this can be referenced in the following Epic article: Telehealth - Context-Aware Linking (OAuth3 approach).
- Obtain your SMART on FHIR URL from the Epic Interconnect configuration. This is needed to setup your Vidyo tenant. Confirm that this URL is on the allowlist for your environments.
- Confirm with your Epic team that the SMART on FHIR URL is enabled for both read and write access.
- Configure your TXT Record Configuration to Define Which Web Services Are Available to Third-Party Video Clients (Vidyo).
- Configure your TXT Record Configuration to Enable Additional Video Visit Features Using the TelemedicineConfiguration Web Service
|
Note For additional guidance on the above steps, reach out to your Epic TS. |
Configure your tenant
|
Note You must make sure that you have enabled the updated Client-IDs via App Orchard before changing the App version. This change will update all requests to use the new Epic Client ID – including the SetExternalConnectionStatus API. |
To configure SMART on FHIR in the Tenant Admin:
- Log in to the Tenant Admin using your Admin account.
- On the top menu, click Settings.
- On the left panel, expand Feature Settings and click Epic Integration. The Epic Integration page displays.
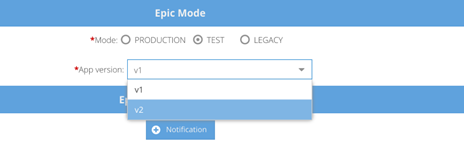
- In the Epic Mode section:
- Select the appropriate Mode. This is usually based on the environment on which you are enabling this feature. We recommend that you always start with TEST for initial build and testing. Only select PRODUCTION after all your testing has been completed and is successful.
- Expand the App version list and select v2.
- In the SMART on FHIR section:
- Select the Enable SMART on FHIR checkbox.
- Enter the URL provided by Epic in FHIR Server Endpoint URL.
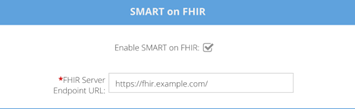
- Click Save.
Update your FDI record for LaunchToken
To provide your Providers with links that can invoke the Save Media integration, an additional dynamic parameter, launchToken, must be added to the generated Epic CAL link. To do this, the FDI build needs to be updated.
|
Note The launchToken parameter should ONLY be added to Provider links. It should not be added to patient links. For this link to work, the Provider must be using VidyoConnect for Desktop 22.1.0 or later. |
- In Client ID, add the Vidyo Context-Aware Linking Client ID (as defined in App Market for the Vidyo Context-Aware Linking App – version 2.0).
- In OAuth3 Type, add 81454-TELEHEALTH - NO CONNECTION OAUTH TOKEN TYPE
- Add the &launchToken=%OAUTHLAUNCHID% to the CRYPTURL mnemonic:
https://[tenant- url]/join/?extDataType&extData=%CRYPTSTR%&launchToken=%OAUTHLAUNCHID%
Test
Use the Context Aware Sample Link Generator in the Tenant Admin to generate a sample Epic CAL URL link.
Configure and use an auto-moderator PIN
This section contains information for configuring auto-moderator PINs.
Using Vidyo’s Epic Context-Aware Linking (CAL) integration, multiple providers can now be given moderation privileges explicitly by a parameter in the CRYPTSTRING.
Prerequisites
For the required component versions for this feature, see Epic CAL feature compatibility with Vidyo versions.
Add the allowMod parameter to the CRYPTSTRING
allowMod is an optional CAL link parameter that allows Epic integrations to automatically give providers the ability to moderate a conference. This parameter must be used together with the AP=1 parameter (Auto-provisioned provider).
|
Parameter |
Value |
|---|---|
|
allowMod |
|
The allowMod parameter must be included inside the CRYPTSTRING as part of the encrypted extData that is passed to Vidyo from the Epic FDI record.
Here is an example of a decrypted CRYPTSTRING with the allowMod parameter (with added line breaks for legibility):
SessionID=10007057852&ConferenceID=10007057852
&ExternalID=165790&ExternalIDType=1
&FirstName=Krishnan&LastName=Ram
&AppointmentTime=08/11/2020 02:00 PM
&LinkValidityPeriod=60&AP=1&EPB=e1&allowMod=1
When allowMod is used for a conference, only the providers that have the allowMod=1 parameter invocation will receive moderation privileges.
Test
Use the Context Aware Sample Link Generator in the Tenant Admin to generate a sample Epic CAL URL link with the allowMod parameter.